Some time ago I decided I needed to do something different for our chore charts. I wanted a job for hire board. I thought about checklists to help the kids remember the daily things they needed to do. I thought about regular rotating chore charts. It seemed like a lot of different charts to have to make. I looked all over pinterest and nothing stood out to me until I found this amazing idea. It seemed pretty involved as far as making it, but I loved the look and a lot of the ideas behind it – especially because it had all the charts I wanted in one place. I decided to see what Paul thought, since I would enlist him in building it, and he agreed. After a few months (mainly because we had so many other things demanding out attention that we kept shoving it aside) we finally got it completed today. I had a number of requests on Facebook for more details and some close-ups, so I obliged.
First off, here is what the whole thing looks like:

The ladder was not hard to build and Paul has a saw and such, so I put him to work. He cut and sanded and painted. We have two pieces running along the back that we fixed the head board and all the smaller ladder boards on. I don’t really know dimensions – we just looked at the picture I found on pinterest and then we figured how big we wanted to make ours for the space where we wanted to put it. I could have done it myself probably, but power saws and such make me nervous (I mean, good grief, look at what I did with a lawn mower and my toe in high school, lol).
Then I got to do the fun part. I’ll start from the bottom up.
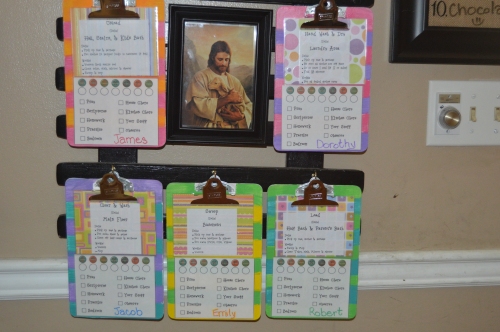
We talked about a bunch of ways we wanted to do the kids chore chart & checklists, and finally I decided I liked the clipboards the best for a number of reasons – namely they required the least amount of extra work. These were plain brown boring ones I got at Staples for $2 a piece. I painted them to make them more interesting. On the bottom is their daily checklist – it’s fixed permanently onto the clipboard. These are the things we expect of them daily simply because they are alive. They are all pretty self explanatory except possibly “Your Stuff” which means to make sure your stuff is gathered and put away from around the house & “Observe” where we want them to observe 1 thing in the house that needs to be done and then do it without being asked. I laminated the cards so they can mark them off each day with a dry erase marker. If they complete their checklist for the day, they get to check the day off up above. Once a week I will give them a ticket for each day they completed their checklist.

The top card on the clipboard is the rotating chore job. They have 2 chores each week: a kitchen chore and a household chore. Those are laminated for durability and get moved each Sunday. On them I listed what I expected to be done daily & weekly in each chore area.
The next section of my board consists of a row of buckets. Target has adorable buckets for $1 I love color so I got colorful ones (and I might trade them out if other more colorful ones appear). You will find them in the $ section close to where you walk in. The buckets are utilitarian in purpose – that’s where we put the tickets they earn and store the dry erase markers for the kids to mark their checklists with.

Finally comes the upper section:
Just above the buckets is a little picture frame where I can write (in dry erase) the date of the next reward day (we will probably have one about once a month or so) and a list of what they can order with their tickets. We will probably change this up from time to time, but it’s a way to use incentives to motivate them. Then we have the Service bucket. Paul and I decided we wanted to have a spot where anyone could put in service they see needs to be done or would like to have done. The kids can pull out an act of service and complete it. Also in the service bucket is a dry erase marker & a regular pen (we though we might have an issue with ticket transference from one kid’s bucket to another, so the idea was proposed by our oldest to write names on the tickets so there can be no confusion). Finally is a little box where we keep help wanted chore cards and we might poke an eraser in there for chart cleaning, etc.


Across the top and above the little black box are our chore for hire cards. These are chores above and beyond what we would typically ask and are willing to pay for. We are pretty cheap parents and don’t pay much (mostly because we can’t afford to shell $10 out a kid each week, heh), but it gives them an opportunity to learn to work for a wage. We sat down and made a list of what chores we felt were above and beyond and the amount we were willing to pay and I made a set of cards. I’m sure I will add on to them as time goes and we think of more things. As we see or feel the need for certain jobs to be done we will clip them up – they are first come first serve and the child will bring us the card when they are finished. We will inspect and then pay them. Some people keep the money with the card – we don’t because #1 it can be a temptation to wander away with sticky fingers & #2 many jobs are under $1 or depend on how much is done (such as cupboard washing – we pay 10 cents a cupboard so it all depends on how many cupboards they wash). Finally, on the end is the roll of tickets. I think I mentioned earlier that these can be earned (1 each day) by completing the entire check list on the the clipboard.
At some point we will put some cute saying, quote or maybe just Chore Center in the black above the work for hire section, but I haven’t decided what I want there yet.

SO there you have it – our chore center largely copied from the one I found on Pinterest with a few things changed to fit our family personally. We screwed eye screws into the back and strung picture wire between them for hanging. When we put it up, we rearranged things to have our FHE chart, family clock, and blessings board (a really cute present from an awesome friend) all nearby. It’s beside our front door and takes center stage in our living area to help us all remember to actively do our part in helping the home run smoothly.
Do you have a chore chart you love? How do you involve your kids in daily household doings? Share your success/fail (because we all have those too) stories in the comments!
I recently chalkboarded the door too, so it has become a center of family fun as well. We did it with DIY chalkboard paint!
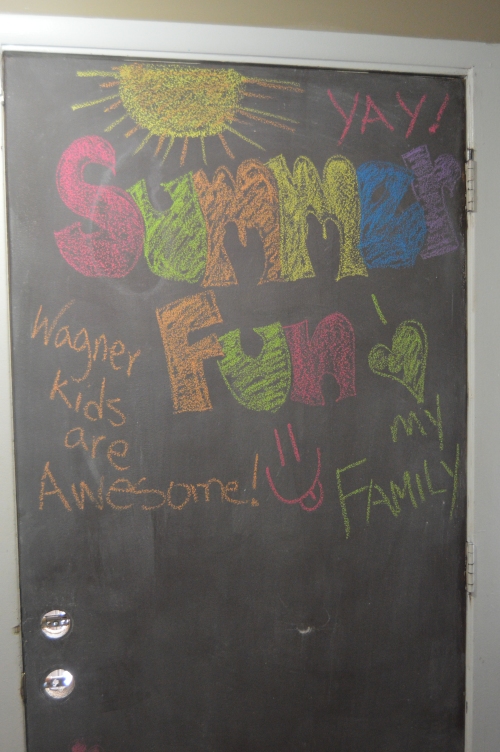

This was super easy and cheap to do. To make your own chalkboard paint in any color you want all you have to do is add 2 tablespoons of unsanded grout to 1 cup of paint and mix it really well. I chose a dark brown color (I felt black would be too dark) and since I was just doing 1 door, I bought a sample from Lowes for $3.50. Add the grout in just before you are ready to paint as it will gradually thicken and get clumpy after a time (a friend gave me her box when she was moving, but it’s not terribly expensive and lasts forever – so ask around if you know anyone who has grouted recently, or get a box to share because all of your friends will want to do this when they see your awesome door! lol).
Once your door is painted and completely dry, prep it by rubbing white chalk all over it in circular motions, then go back and erase it in circular motions and then voila you have an amazing chalkboard door that will be the hit of your home!

We celebrated our 18th anniversary on Monday! Woot! Robert was very proud of his “first boat ever, Mom!”.


 Sometimes I do fold-out inserts by taping to the edge of the page rather than the inside (but I don’t do these as often)


